Nginx has obtained traction from webmasters due to its low-resource and high-performance feature. Although the default configuration of Nginx is already optimized for all the basic workloads; still you can take it to the next level by setting up a server-side cache.
Our Previous Tutorials:
- How to Install LEMP (Linux, Nginx, MariaDB, PHP) on Debian 10?
- How to Install phpMyAdmin on Debian 10?
Here whenever I said “Server-Side Cache” means “Nginx FastCGI Cache”.
What is Nginx FastCGI Cache?
In any LEMP stack, we always configure Nginx to pass PHP requests to PHP-FPM because Nginx itself cannot process PHP code directly.
Nginx is blazing fast when it comes to serving static HTML pages. However, PHP is known to be slow, although the latest version PHP7 is much faster than previous versions. On the other side, MySQL/MariaDB database is another performance bottleneck of LEMP stack websites.
What FastCGI cache does is instead of transferring the dynamic page request to PHP-FPM and letting it generate the HTML page every time, Nginx can cache the generated HTML page so next time it can send cached pages to web browsers, eliminating PHP and database requests.
- This will surely improve your response time or TTFB (Time to First Byte).
- You save a lot of CPU resources wasted on dynamic content processing.
- Limited interaction of PHP and Database means the low load on the server.
- It will serve the cached resources when PHP and Database fail or stop.
FastCGI is the medium between Nginx and PHP-FPM so the cache is called FastCGI cache.
Why Server-Side Cache?
Because one less plugin is needed in my site which is built on WordPress. In this article, I’ll show you how to set up FastCGI Cache with the Nginx server.

This article assumes you have direct access (SSH) to your server and have root privilege.
Since you’ve already installed Nginx, you don’t need to install anything else.
Just start with editing Nginx’s configuration file/s.
First, we need to set FastCGI cache directives in order to cache work.
Make sure the below directives are placed either in http block if editing nginx.conf or outside server block if editing the site’s configuration file.
fastcgi_cache_path /var/run/webcache levels=1:2 keys_zone=WORDPRESS:100m inactive=60m;
fastcgi_cache_key "$scheme$request_method$host$request_uri";
fastcgi_cache_use_stale error timeout invalid_header http_500;
Now you need to edit the server block for caching mechanism. First, we need to add instructions just below location / { … } the block and then link those instructions with PHP configs.
Cache Instructions
set $no_cache 0;
if ($request_method = POST) { set $no_cache 1; }
if ($query_string != "") { set $no_cache 1; }
if ($request_uri ~* "(/wp-admin/|wp-.*.php|/feed/|index.php|sitemap(_index)?.xml") { set $no_cache 1; }
if ($http_cookie ~* "comment_author|wordpress_[a-f0-9]+|wp-postpass|wordpress_no_cache|wordpress_logged_in") { set $no_cache 1; }
These instructions cache everything by default, and then set no-cache to recommended stuff.
Link Cache Instructions with PHP
To edit PHP configs, just search for the PHP location and add the following directives.
Note: You need to add below yellow-colored directives only in addition to existing directives, do not delete any default configs just add the following.
location ~ .php$ {
    // ... default configs ... //
    fastcgi_cache_bypass $no_cache;
    fastcgi_no_cache $no_cache;
    fastcgi_cache WORDPRESS;
    fastcgi_cache_valid 200 10m;
    add_header X-AtulHost-Cache $upstream_cache_status;
}
Now everything is perfect to make a test run. Save the config file/s.
Before restarting Nginx, I’ll recommend you do a dry test for any errors.
nginx -t
If no error is showing that means you are good to go.
systemctl restart nginx
Now you’ve FastCGI cache enabled, you can handle more traffic from the existing server.
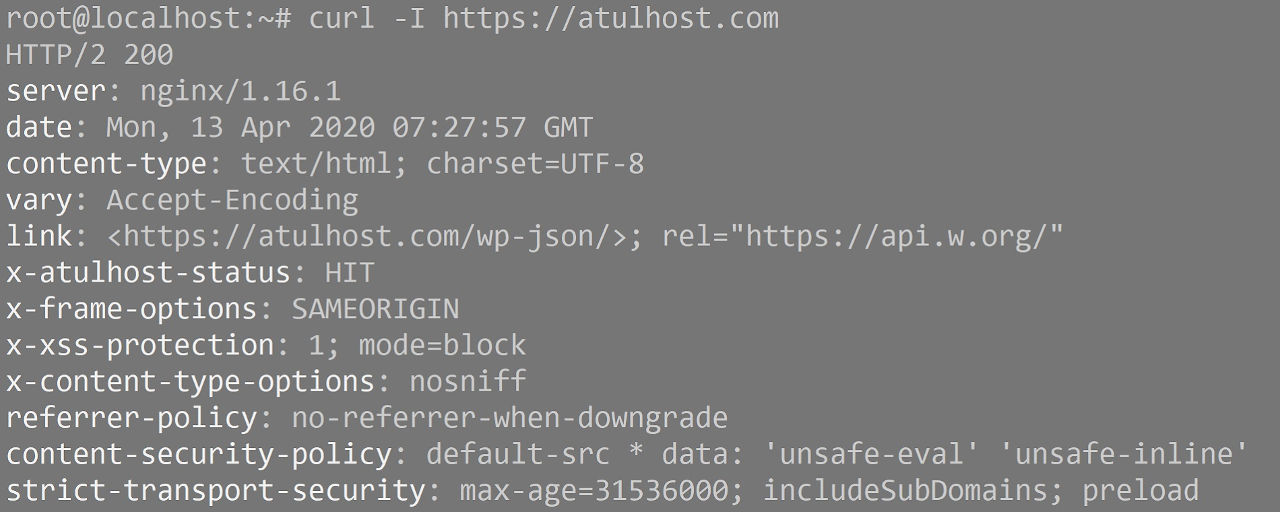
To test it on your SSH terminal use the following command.
curl -I http://www.Your-Domain.com
Here is our outcome: look for x-atulhost-status line.

Here, HIT means Cached and MISS means Not Cached Yet.
If you have any configuration issues do let us know.
Leave a Reply